
For end-user Microsoft Teams deployment, different considerations should be taken. If you are an Office 365 Admin, you should rather read “Things to Consider Before Deploying Teams,” which is catered directly to organizing successful Microsoft Teams rollouts.
Prerequisites for Setting Up Microsoft Teams
Before installing and setting up Microsoft Teams on your computer or mobile device, there are various prerequisites that you must have to ensure that the program can run properly.
System requirements for using Microsoft Teams
Both the desktop and web applications of Microsoft Teams can be run on a Windows PC, Mac, or mobile device.
For Windows PC systems, a minimum of 1.1 GHz, two-core processor with 4.0 GB of RAM, and 3.0 GB of available disc space are necessary. For Mac systems, a Core Duo processor, 4.0 GB of RAM, and 1.5 GB of available disk space are required.
Necessary hardware and software to run Microsoft Teams effectively
Microsoft Teams function best using the most recent version operating system available, so it’s best to update your system before Microsoft Teams use. Currently, Windows Server 2012 R2 is the oldest Windows operating system that Microsoft Teams can run on, but Windows 11 is recommended.
One of the three most recent macOS systems is required for proper use. For example, if you have the third oldest version macOS system and another version is created, you will need to update your system to use Microsoft Teams.
On mobile devices, the latest four versions of Android will be supported, as well as the latest two iOS versions for Apple products.
If intending to utilize the voice and video chat features of Microsoft Teams, a built-in or external camera, microphone, and headphones or speaker are required for proper function.
How to Set Up Microsoft Teams?
Now it’s time to set up Microsoft Teams. You may wonder how to set up Microsoft Teams, especially if you’ve never used the application. Below is a beginner’s step-by-step guide to setting up and using Microsoft Teams.
Step 1: Sign Up for Microsoft Teams
The first step in setting up Microsoft Teams is signing up for an account. This involves both creating an account and purchasing a Microsoft Teams subscription.
How to sign up for Microsoft Teams and create a Microsoft account?
To use Microsoft Teams, you need a Microsoft Account. This Microsoft account can be associated with any email address and does not have to be an ‘outlook.com’ email. If you’ve used services like Skype, Microsoft OneDrive, or Office 365 products before, you will likely already have a Microsoft account.
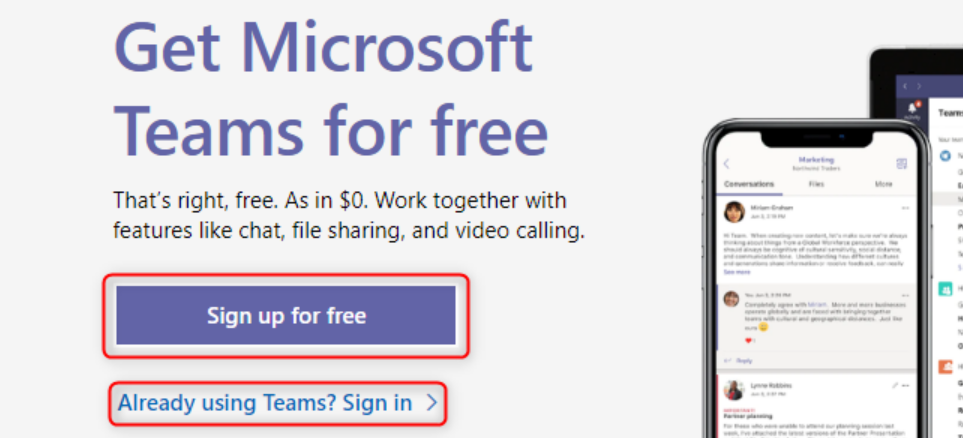
If you don’t have an account or would like to create a new one, head to the Microsoft Teams Account Page and select “Sign up for free” in the top right corner. You’ll be prompted to enter your email address and select whether your account is intended for school, family and friends, or work and organizations. You may then create a password and verify your email address through a link sent to the email address used.
Once your Microsoft account is created, you’ll be sent to your Microsoft Teams page.
How to purchase a Microsoft Teams subscription?
While free versions of Microsoft Teams are available for family and friends or educational organizations, businesses must select from a set of Microsoft Teams subscriptions. Choose from Microsoft Teams Essentials, Microsoft 365 Business Basic, or Microsoft 365 Business Standard. Each increase in price and available features. The Essentials version may work well for smaller companies, but larger businesses may benefit from premium features like Microsoft Whiteboard and webinar hosting.
Click “Buy Now” under your preferred product, enter your Microsoft Account email address, and continue through the payment and order completion steps.
Step 2: Set Up Your Profile
After signing up and purchasing your Microsoft Teams subscription, you can now set up your profile. This is where you enter your personal information and is an essential step in how to set up Microsoft Teams.
How to set up your Microsoft Teams profile?
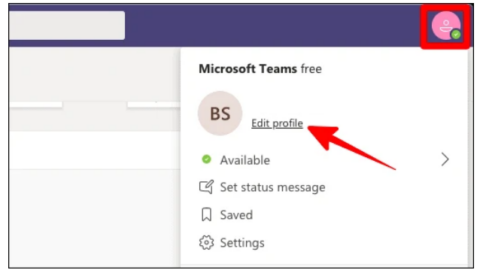
Head to the top right corner of the Microsoft Teams web or computer application. Click on the circle in the top left corner with your initials. If you hover over the initials again, a small camera icon pops up that you can click on to upload a profile picture. Choose a picture that best represents you, your professional identity, or your logo.
You can enter your settings by clicking on the “manage account” button. Choose from various design preferences, privacy settings, notification styles, captioning, and more.
What are the benefits of having a complete profile in Microsoft Teams?
When learning how to set up Microsoft Teams, completing your profile to the best of your ability is important. This ensures that you have a personalized profile that suits your needs best. For example, you can set up closed captioning if you have difficulty listening to audio during video conferences.
Further, a complete profile makes it easier for collaboration. Your coworkers will know who they’re interacting with, and notification settings ensure you never miss a beat.
Step 3: Create and Manage Teams and Channels
After setting up your profile and managing your Microsoft Teams settings, you can begin joining or creating teams and channels.
What Are the Differences Between Teams and Channels in Microsoft Teams?
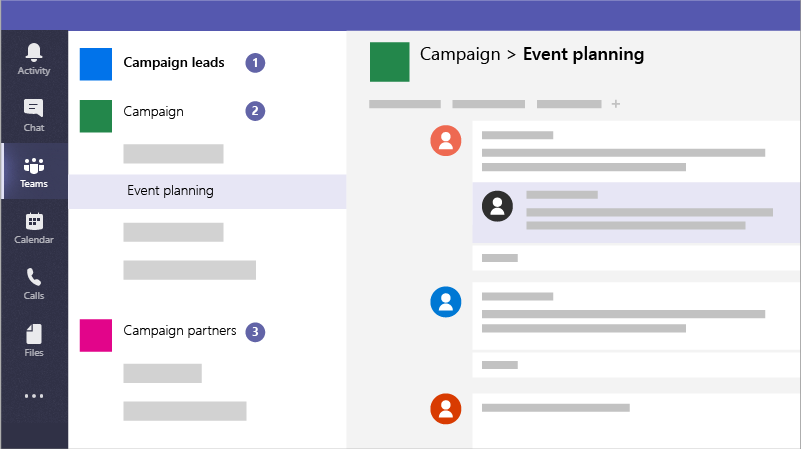
In Microsoft Teams, there are two groups: teams and channels. Your team is the overall group of people and content within your organization. It allows everyone within that organization to access the same tools to collaborate successfully. Teams may be either private and invite-only or public for a maximum of 10,000 members.
Channels are more specialized groups under your team. It’s where the work actually happens. You hold conversations with your immediate group members and share project files Within your channels. Essentially, channels are subsections of your team.
How to create new teams and channels, and manage existing ones?
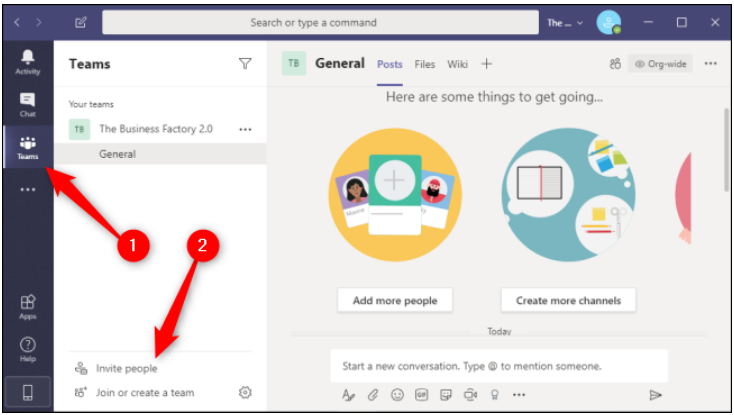
Learning how to set up Microsoft Teams accounts comes with knowing how to create teams and channels. To create a new team, locate the “join or create team” button, followed by “create a new team.” Here, you’ll add a team name and description and set whether it is public or private. You can then add a team owner under “more options” and “manage team.” Under the “Members” tab, you’ll find “role,” where you can then select an owner.
To create a new channel, navigate to the team you created. Under “more options,” click “add channel” and provide a descriptive name so that users understand its direct purpose.
Manage existing teams and channels under your team’s “more options” settings. There are many features to play around with, and some organizations may benefit from certain options more than others.
How to manage team and channel membership and permissions?
The team or channel creator can manage team and channel membership and permissions. First, select your team’s “more options” setting, followed by “manage team.” Under “manage team,” you can view the team owner and all current members and guests, add and remove members, and set roles.
To manage channel membership, the “more options” and “manage channel” tabs will guide you to permissions under “channel settings.” Here, the channel owner can choose who can post messages. Further, the “analytics” tab will display an engagement summary of your posts for the last 30, 60, or 90 days.
Step 4 : Add and Communicate with Team Members
Now that you have a team set up, you should add members to your team to enable communication with them. This is often the most important step when learning how to set up Microsoft Teams. Without adding members, you can’t collaborate on projects.
How to add new members to your teams and channels?
To add members to your team, go to “more options,” followed by either “add member” or “manage team.” When you “add member,” you’re permitting another person to access your team. Under “manage team,” the “add member” option is also visible.
Similarly, adding members to an individual channel requires selecting “more options” and “add members” under the channel itself.
How to communicate with team members using chat, audio, and video calls?
After adding members to your team or channel, you can begin collaborating through chat, audio, and video calls. Set up a general chat channel, then open that channel. Under the “posts” tab, you can select “new conversation” at the bottom of the screen, where you can then type a message, tag a team member, and attach files, stickers, or praises. Everybody under your channel will see this chat.
For private chat messages, select “chat” on the left-hand side of your screen. Add the name tags associated with the people you wish to message where it says “To:” at the top of the screen. Add and send your message here. Then, switch between conversations in the pinned or recent chats on the left side of your chat screen.
To set up audio or video calls, on the left side of your screen, select “calls.” Next, add who you wish to communicate with either individually or by group by typing names or team names in the “type a name” bar. Your call will default to audio, where you can click the camera button to turn on video.
Lastly, you can schedule calls by clicking on the “calendar” tab on the lefthand bar. Click the date and time you want your meeting to be, or press “New meeting” at the top right corner. Add your meeting details, such as time and date, required attendees, location, and meeting description. All required attendees will receive an invitation with a meeting link and the details you provided.
How to start using the main collaboration features in Microsoft Teams?
There are many accessible collaboration features in Microsoft Teams. The most common forms are chat, audio, and video messaging. However, features like Together Mode allow all members in a video conference to view each other sitting together on a virtual auditorium background. This is useful for collaboration by enabling a sense of togetherness and decreasing video chat fatigue.
Using the Whiteboard app in Microsoft Teams allows for the sharing of visual outlines and thoughts. This feature is available in a meeting by pressing the whiteboard icon.
Work on files collaboratively with your team by selecting “more options” next to a shared file in your team conversation or files tab. Select whether you wish to edit the file online or on your desktop, and click “start conversation.” You can then add a message, mention someone, and send it to people to work together in real time.
When learning how to set up Microsoft Teams, it’s beneficial to learn about all the unique collaboration features it can offer your organization.
Step 5: Customize and Optimize Your Microsoft Teams Experience
Microsoft Teams is a customizable platform allowing each organization to arrange their pages however they want. Further, different members can change their own settings to best represent their own needs.
How to customize and optimize your Microsoft Teams experience to meet your specific needs?
There are dozens of features to customize Microsoft Teams to your needs. First, if you have difficulty staring at a bright screen for hours a day, Dark Mode is available in “manage account” after clicking on your profile image in the top right corner. Under the general tab, select Dark under “Theme.” Other themes and layouts like high contrast, grid and list view for teams, and chat density are available here.
Further, add status messages under your profile icon where it says “set status message.” This allows other members to read your availability message if they hover over your profile. Add text or emojis for personalization.
Lastly, there are apps that can be added to your Microsoft Teams profile. These extensions can help organize your documents, take polls from your team members, share videos, sign documents, and more.
Take time and play around with the dozens of settings available under “manage account” to see what best suits your needs.
How to customize your notifications, language, and settings?
You can customize your notifications, language, and settings by clicking on your name icon in the top right corner of the screen. Then, clicking on “manage account” will lead you to your settings. Here, you can navigate between tabs such as General, Privacy, Notifications, and Accessibility.
Under “Notifications,” choose whether you receive sound or banner displays for chat messages, mentions, meetings or calls, and tips or recommendations from Microsoft Teams. You can also choose whether you are reminded of a missed activity and the frequency of your reminder.
Change your language settings under the “General” tab. Scroll to where you see “language,” and select your desired app and keyboard language.
Other settings you can choose from include turning on captions, prioritizing signers for sign language, scheduling out-of-office replies, configuring your voicemail box, and choosing a ringtone.
How to use keyboard shortcuts and apps to enhance your Microsoft Teams experience?
The use of keyboard shortcuts makes navigating Microsoft Teams easier. When learning how to set up Microsoft Teams, educating yourself on certain keyboard shortcuts can make your team collaboration easier.
Common shortcuts include:
- Ctrl + Period (.) to show all keyboard shortcuts
- Ctrl + E to enter the search bar
- Ctrl + N to start a new chat
- Ctrl + Comma (,) to open setting
- Ctrl + 2 to open chat
- Ctrl + 5 to open calls
- Ctrl + Enter to send message
There are plenty of keyboard shortcuts to explore. Look through a list of all shortcuts to identify and learn the ones that will be most beneficial to you.
What Are the Next Steps to Take After Setting Up Microsoft Teams?
Now that you’ve set up your Microsoft Teams account and channels, explore all of your configuration options. From call forwarding options to real-time collaboration, the options are endless.
Be sure to check out the available app extensions that can be added to your Microsoft Teams account. There are hundreds to choose from, and each offers something unique. There are plenty of apps and settings to play around with to ensure that you get the most out of your organization’s meetings.
Start Meeting with Your Colleagues Today
Figuring out how to set up Microsoft Teams for your organization can be complex, especially if you don’t have a tech background. Powell Governance can help you carefully plan and prepare for your Microsoft Teams rollout. From establishing clear policies and procedures to ensuring data security and compliance, our team can help your company properly customize and configure your accounts appropriately.
Contact us today for expert assistance with your Microsoft Teams rollout and other digital workplace solutions.


Emily Houssier
Regional Marketing Manager
Comme dans "Emily in Paris", Emily s'appelle Emily et vit à Paris. La comparaison s’arrête là. Emily poursuit une mission personnelle : rendre la Digital Workplace un peu moins… digitale. Pour elle, le marketing ne se résume pas au pipeline et à la performance ; il s’agit avant tout d’aider les équipes à réellement se parler, à s’aligner autour d’une histoire commune et à construire des environnements de travail que l’on a sincèrement envie d’utiliser.